 belan.tech
Belan Onboarding Playbook
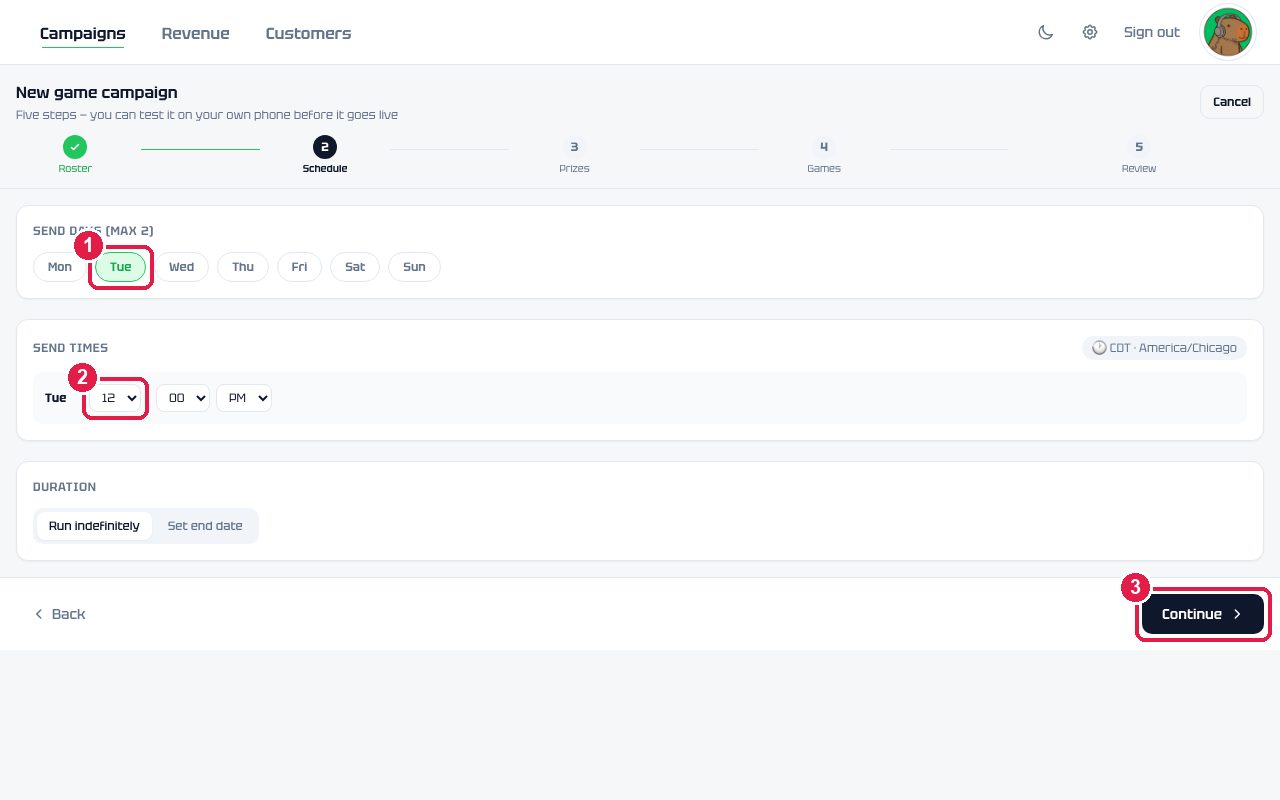
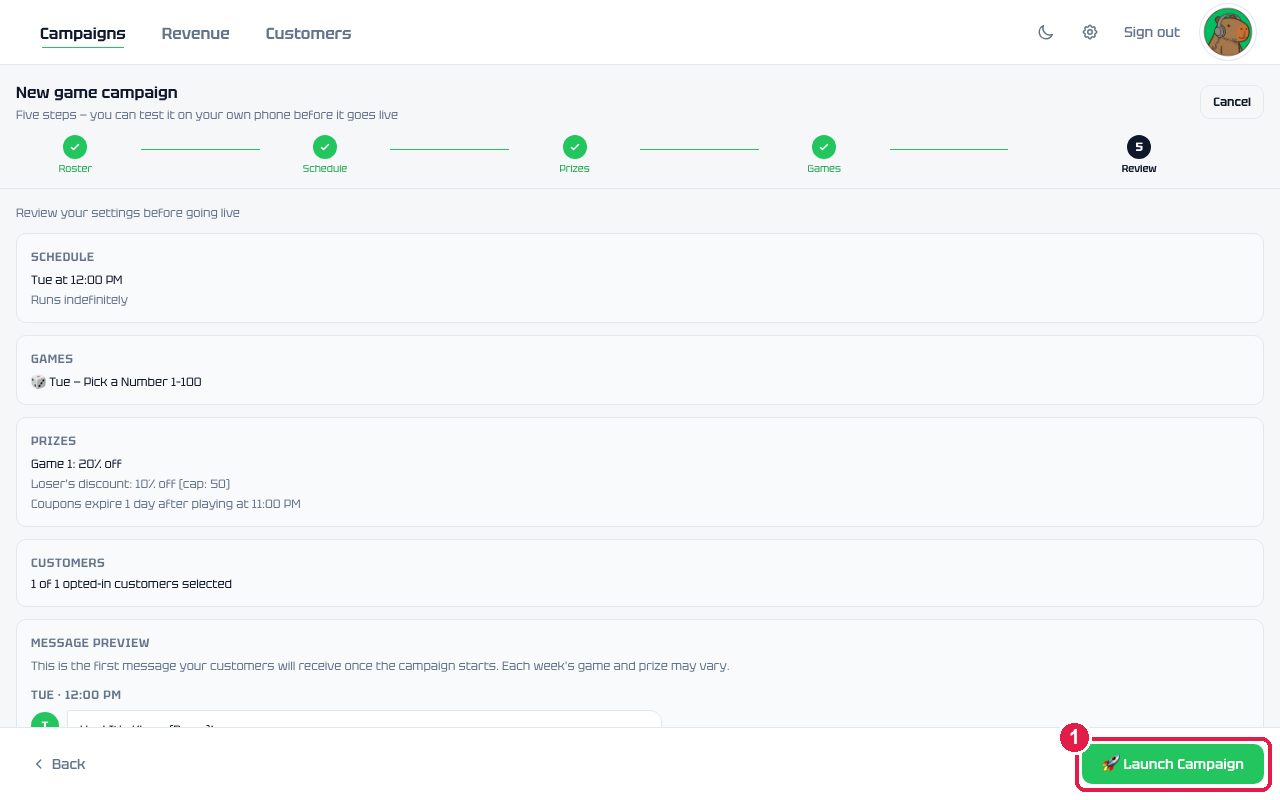
How to take a restaurant from “tell me more” to a launched campaign, in the order it happens. Every step says who does it, where to click, what to say, and what “done” looks like. Screenshots are from the live product; the red numbers on each picture match the notes under it.
Before the call: Belan sets the table
Who: Belan (you + engineering). Time: 1 business day before the owner signs up.
The owner can’t finish sign-up until their restaurant exists in our system with a setup code. Ask engineering for these three things and write them down before you get on the call:
| Item | What it is | Example |
|---|---|---|
| Restaurant record | The restaurant created in Belan under its real name, marked active, with a one-time setup code. | Sauce Bros Pizza · SAUCE-4471 |
| Marketing phone number | The number their texts will come from. Engineering provisions it on Telnyx and attaches it to the restaurant. | +1 (206) 555-0140 |
| Setup code | What the owner types in step 2 to claim the restaurant. Give it to them on the call, not by text ahead of time. | SAUCE-4471 |
Create the owner’s account
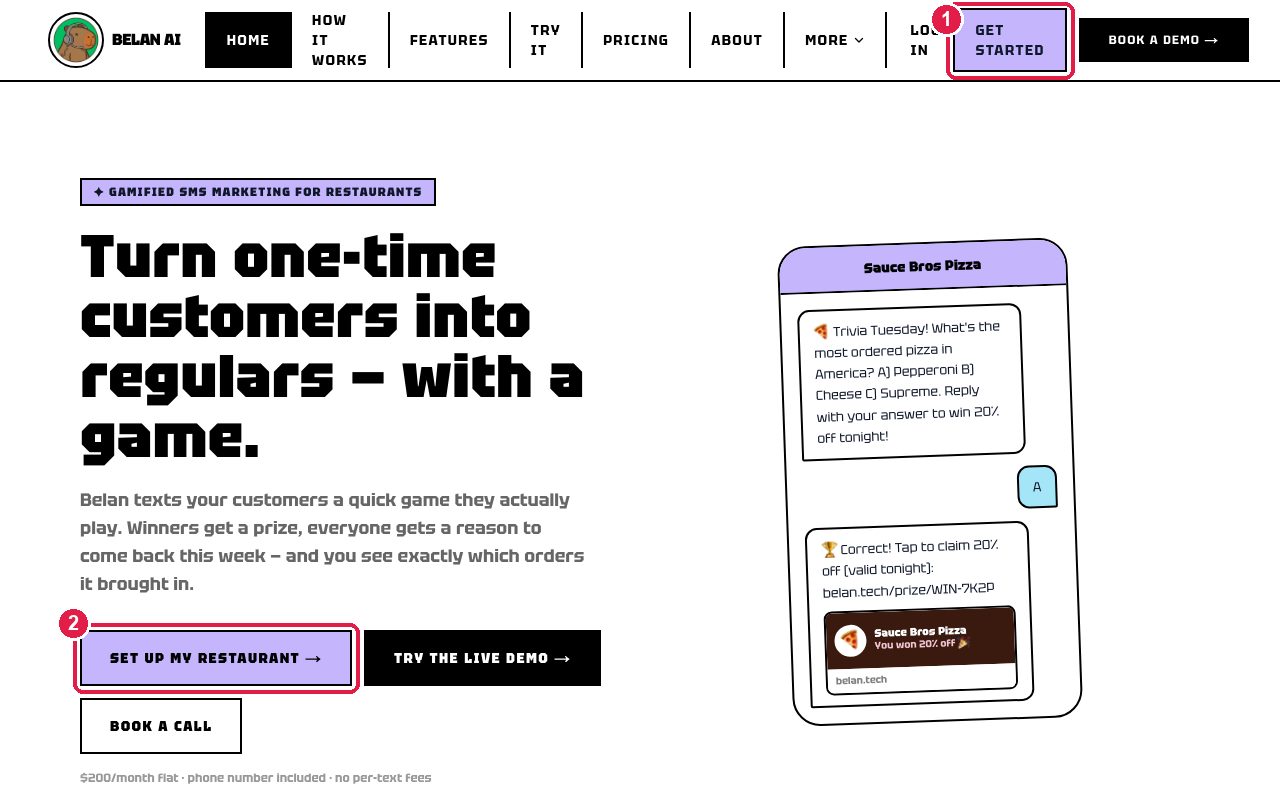
Who: the owner, with you on screen-share. Where: belan.tech → Get started.
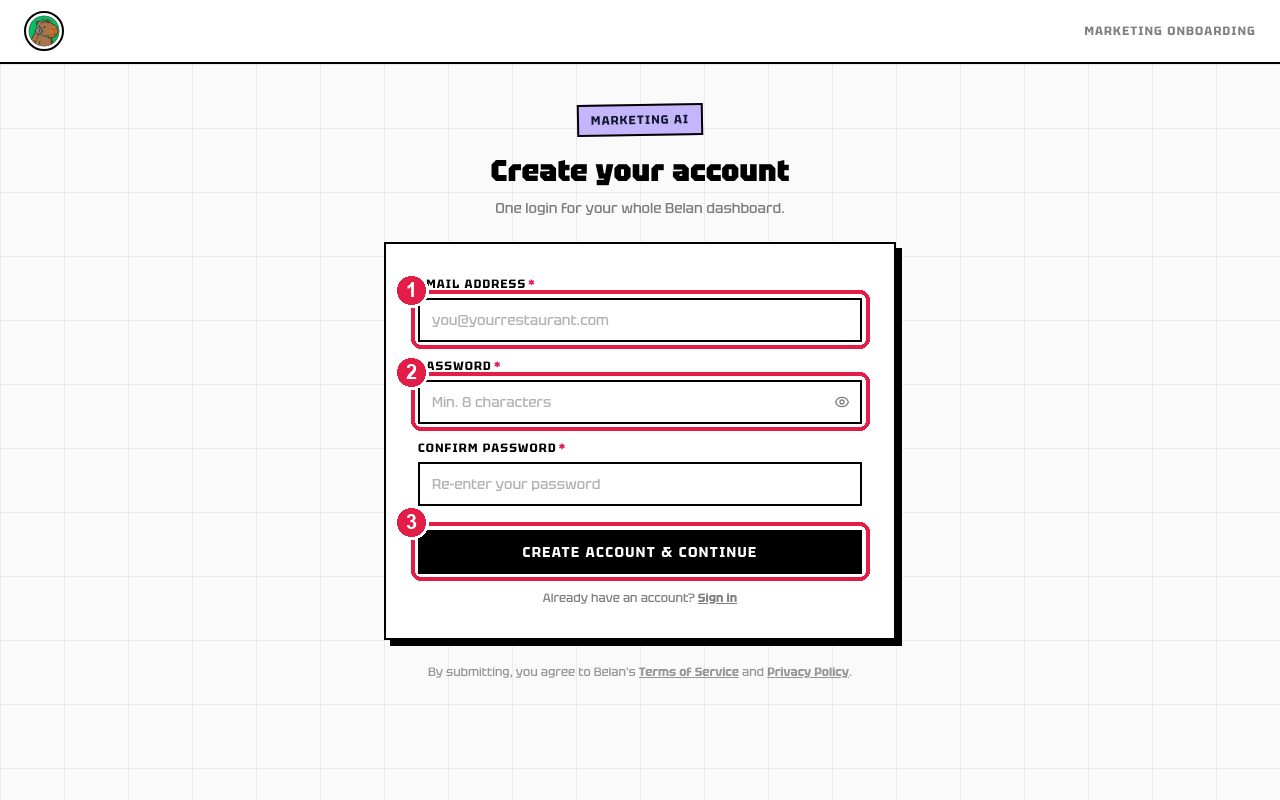
- Owner enters the email they want to log in with, and a password of 8+ characters (twice).
- Click Create Account & Continue. The account is ready immediately; there is no confirmation email to wait for.
Link the restaurant with the setup code
Who: the owner. Where: same wizard, next screen.
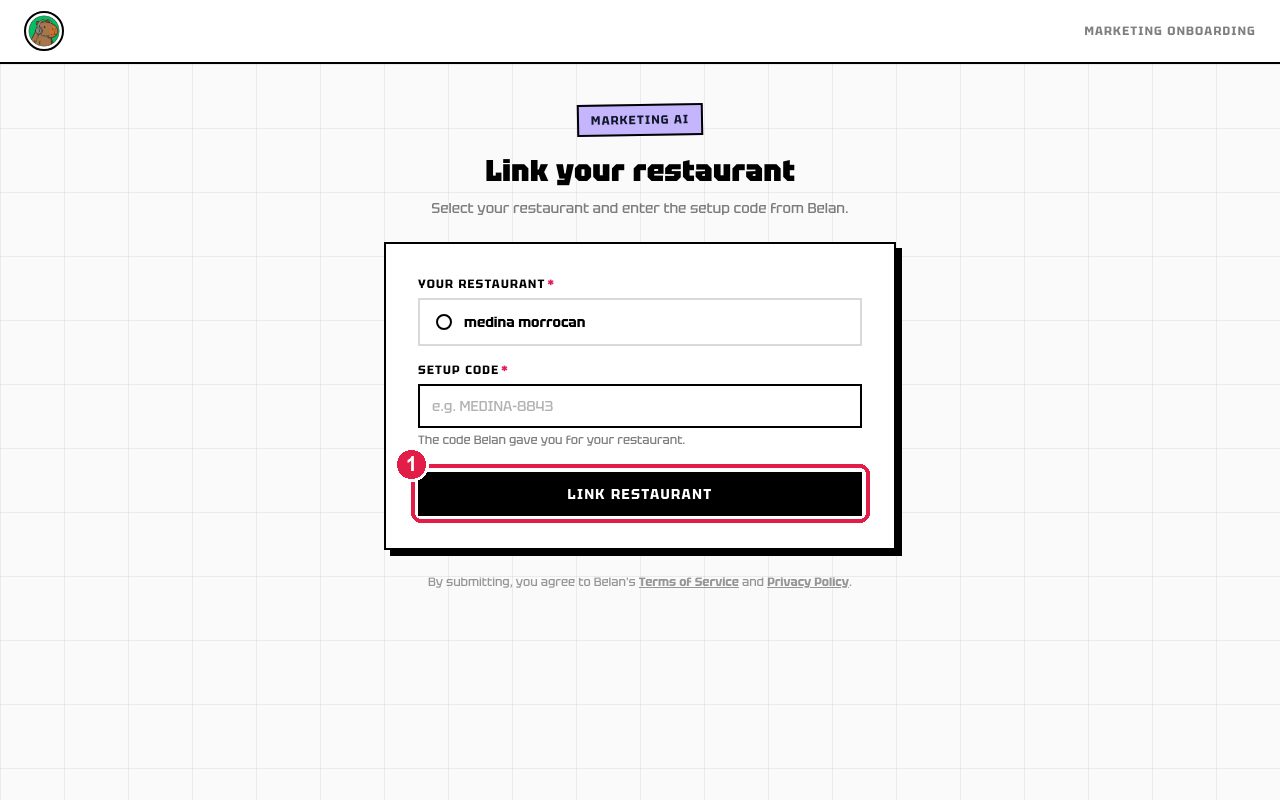
- The list shows restaurants that are ready to be claimed. Owner taps theirs.
- Owner types the setup code you give them. It’s one-time: once used, nobody else can claim that restaurant.
- Link Restaurant. The next screen confirms “Restaurant linked”.
Branded RCS number (optional, $500/yr)
Who: the owner, only if they want their name and logo shown as the sender. Where: the “Restaurant linked” screen offers it.
After linking, the owner sees two choices: go straight to the dashboard, or set up a business RCS number. RCS shows the restaurant’s verified name and logo inside the customer’s messaging app instead of a bare phone number. Carriers require a registration, which is the $500/year fee.
If they choose it, the wizard collects five short screens. Have them ready:
| Screen | They’ll need |
|---|---|
| Business | Legal business name, legal form, entity type, tax ID / EIN |
| Contact | Owner’s name, title, business email and phone |
| Verify | One business document (a business licence or EIN letter, PDF or photo) and the registered address |
| Brand | Logo file, store phone, store email, website |
| Clover | Optional here; skip it. The POS is connected properly in step 6. |
Payment: $200 / month
Who: the owner. Where: “Activate your subscription” screen (card form appears inline).
- The screen says Gamified Marketing — $200/month. Cancel anytime. and shows a secure card form.
- Owner enters card details. If you gave them a promo code, there is a field for it inside the card form.
- On success the “You’re all set!” screen appears with a Go to Dashboard button.
First login and a 60-second tour
Where: belan.tech/login → the Campaigns page.
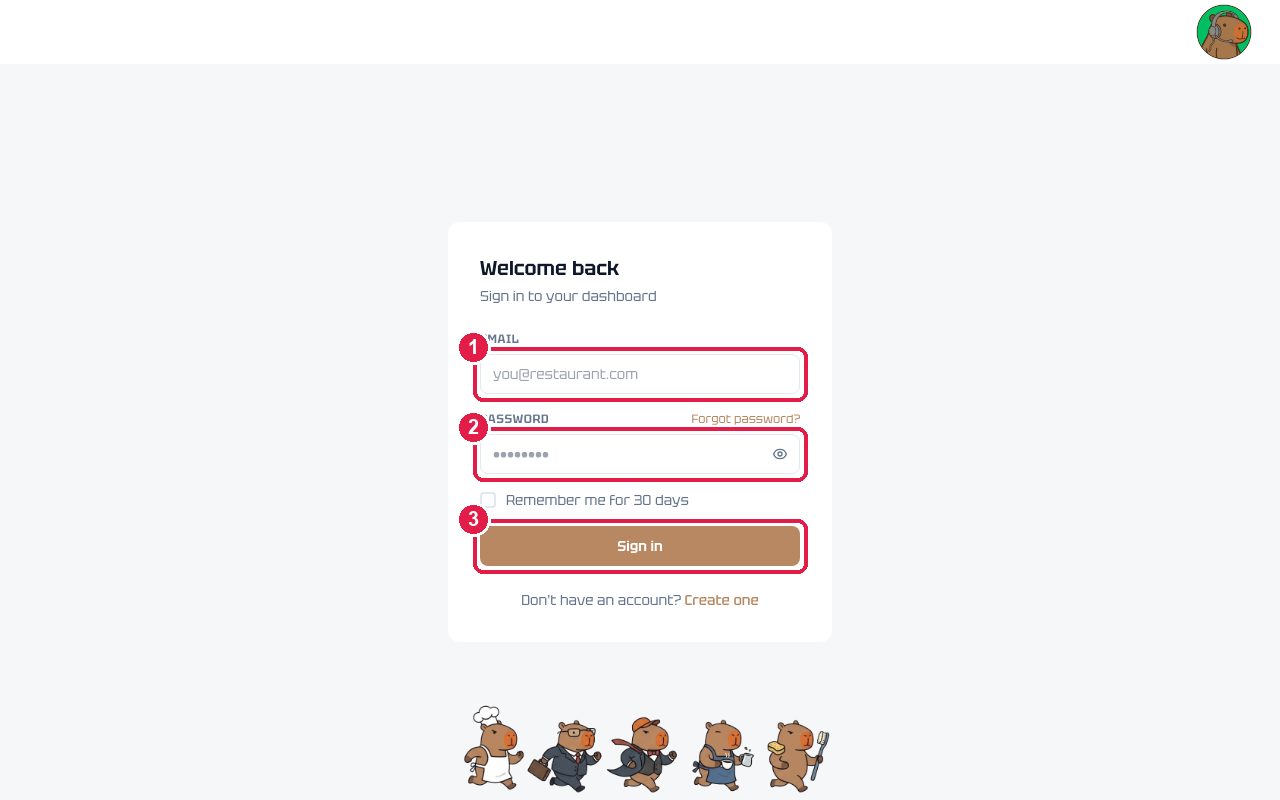
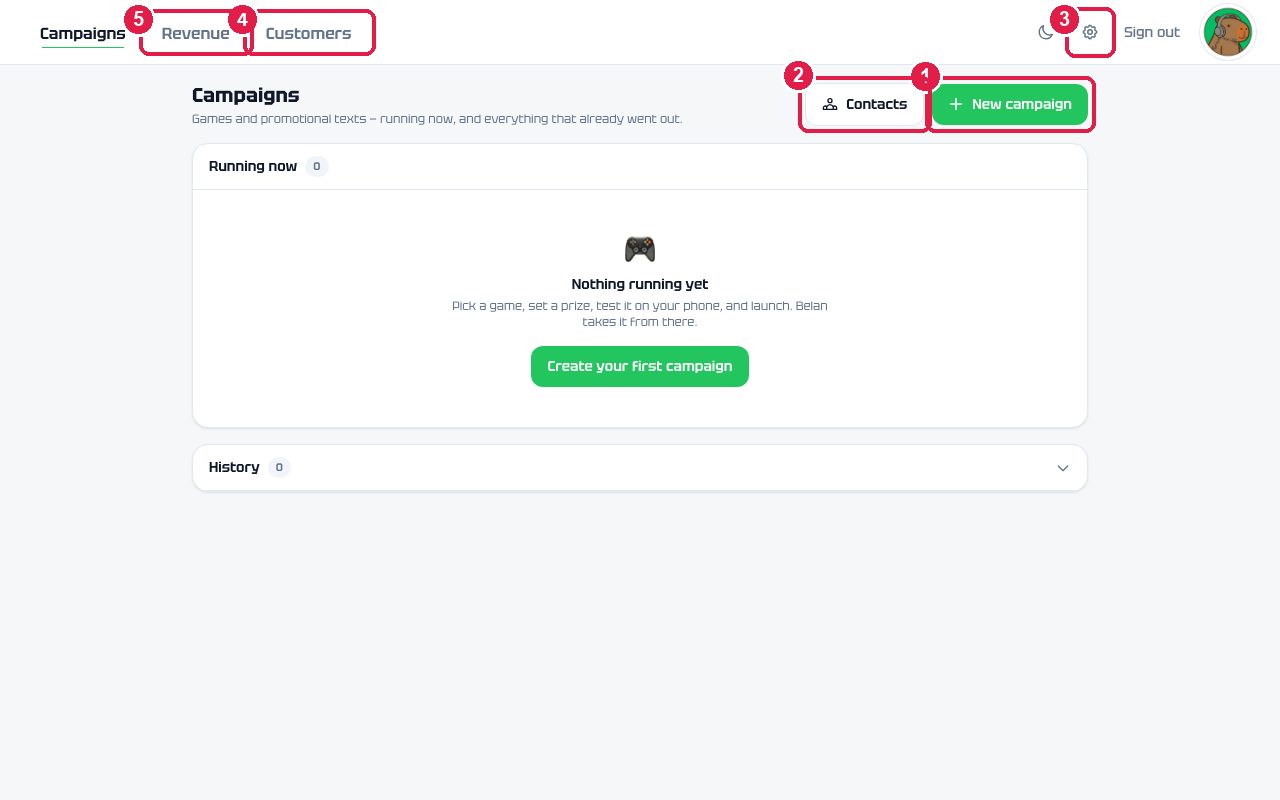
The moon icon switches to dark mode if they prefer it. It only affects their dashboard.
Connect the POS (the API key)
Who: the owner (they must be logged into Clover). Where: gear icon → POS tab.
This is what makes coupons real: once Clover is connected, tapping “redeem” on a coupon creates a discount at the register, and every order that used a coupon shows up under Revenue and in the customer’s timeline. Without it, coupon pages still work but the discount has to be typed in by hand and nothing is tracked.
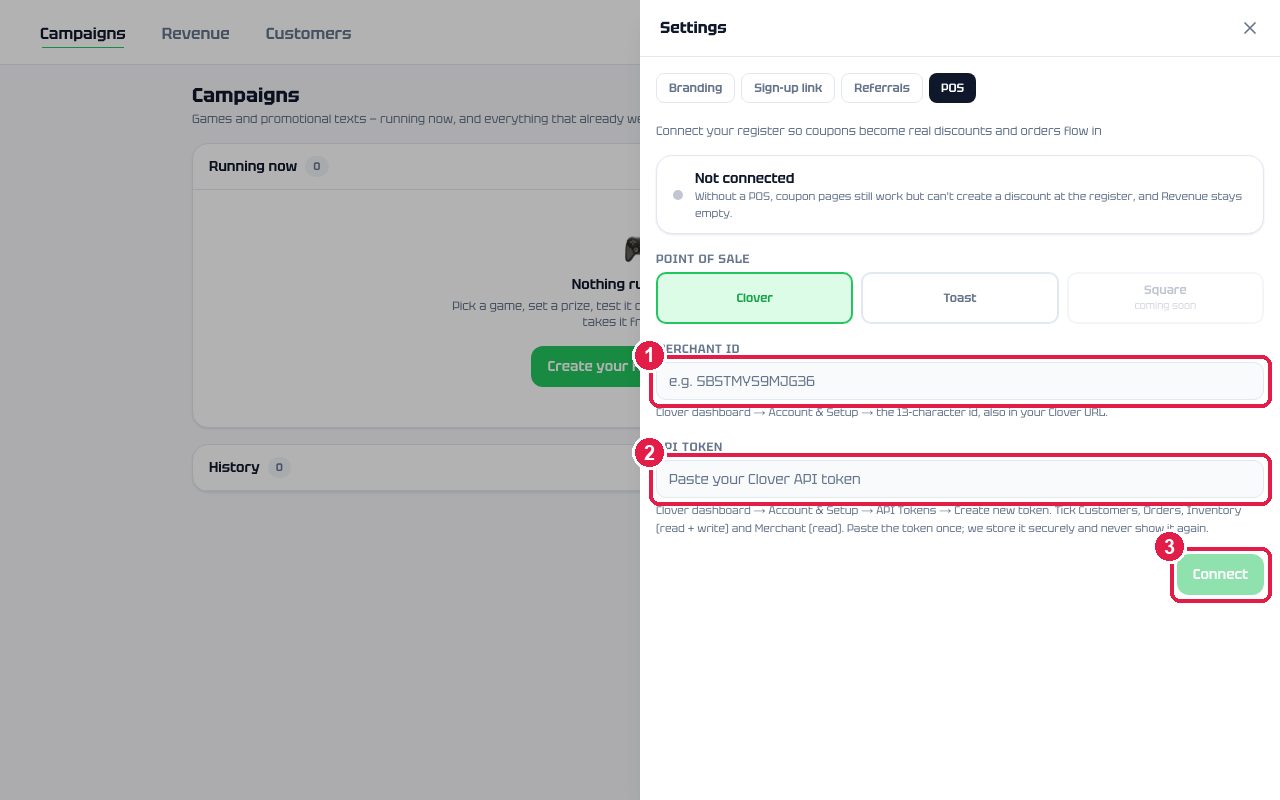
Where the owner finds these in Clover (have them share their screen):
- Log in at
clover.comand open the web dashboard. - Merchant ID: Account & Setup → the 13-character ID at the top (it is also in the browser address bar after
/m/). - API token: Account & Setup → API Tokens → Create new token. Name it “Belan”. Tick permissions: Customers (read), Orders (read), Inventory (read and write), Merchant (read). Inventory write is what lets Belan create the coupon discounts.
- Copy the token, paste it in Belan, click Connect. Belan checks with Clover and shows “Connected to <their business name>” with three ticks: orders, customers, discounts.
Branding: make the coupon look like them
Where: ⚙ Settings → Branding tab.
Branding here is only what their customers see: the thumbnail under a coupon link in Messages, the coupon page, the QR sign-up page, the referral page. The Belan dashboard itself doesn’t change.
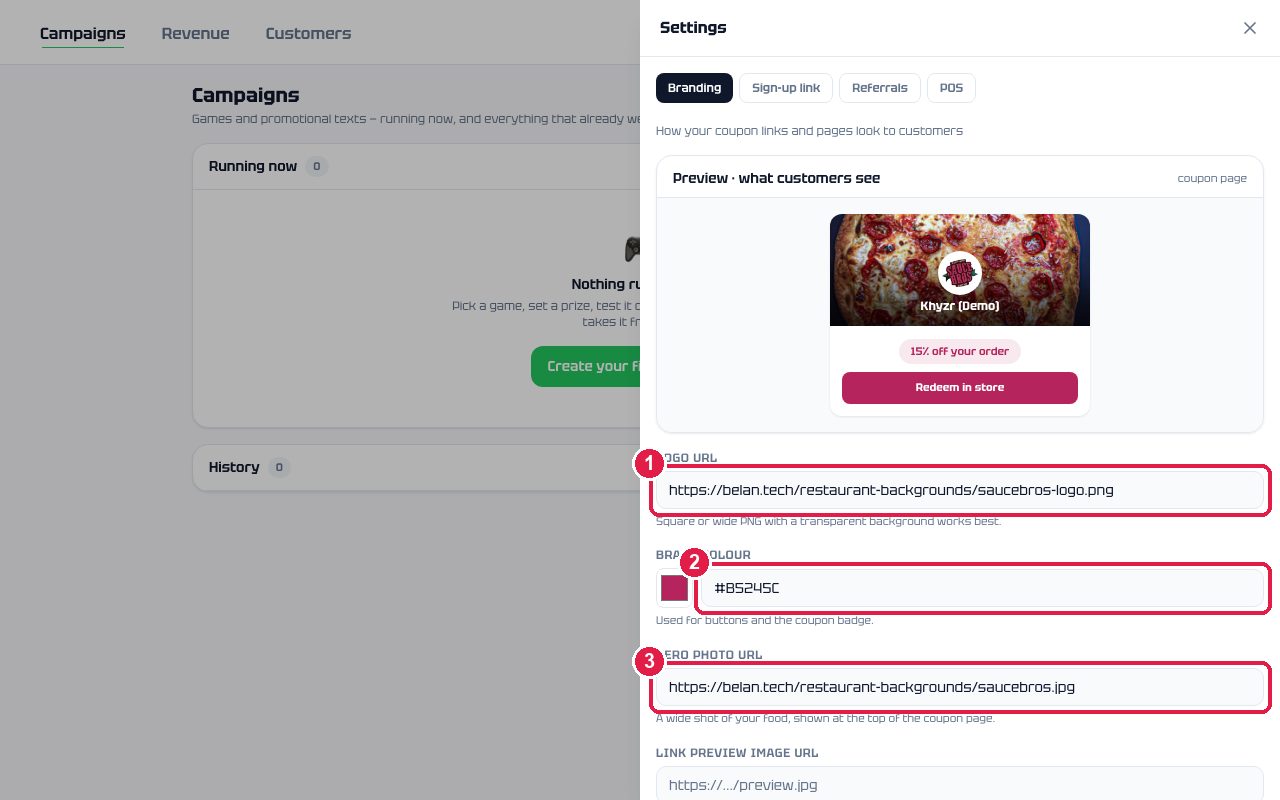
- Ask for a logo (PNG with a transparent background is best) and one great food photo. If they only have files, send them to engineering to host and get back URLs; if their website already has them, right-click the image on their site → Copy image address.
- Paste the URLs, pick the brand colour with the colour box (or type the hex from their website), watch the preview card update, Save changes.
- Leave “Link preview image” empty. Belan generates the thumbnail from the logo, colour and photo automatically.
Turn on the QR sign-up link
Where: ⚙ Settings → Sign-up link tab.
This is how the list grows the safe way: a customer scans a QR code, fills in name and number, ticks a consent box, and gets a welcome coupon by text. Belan records the consent.
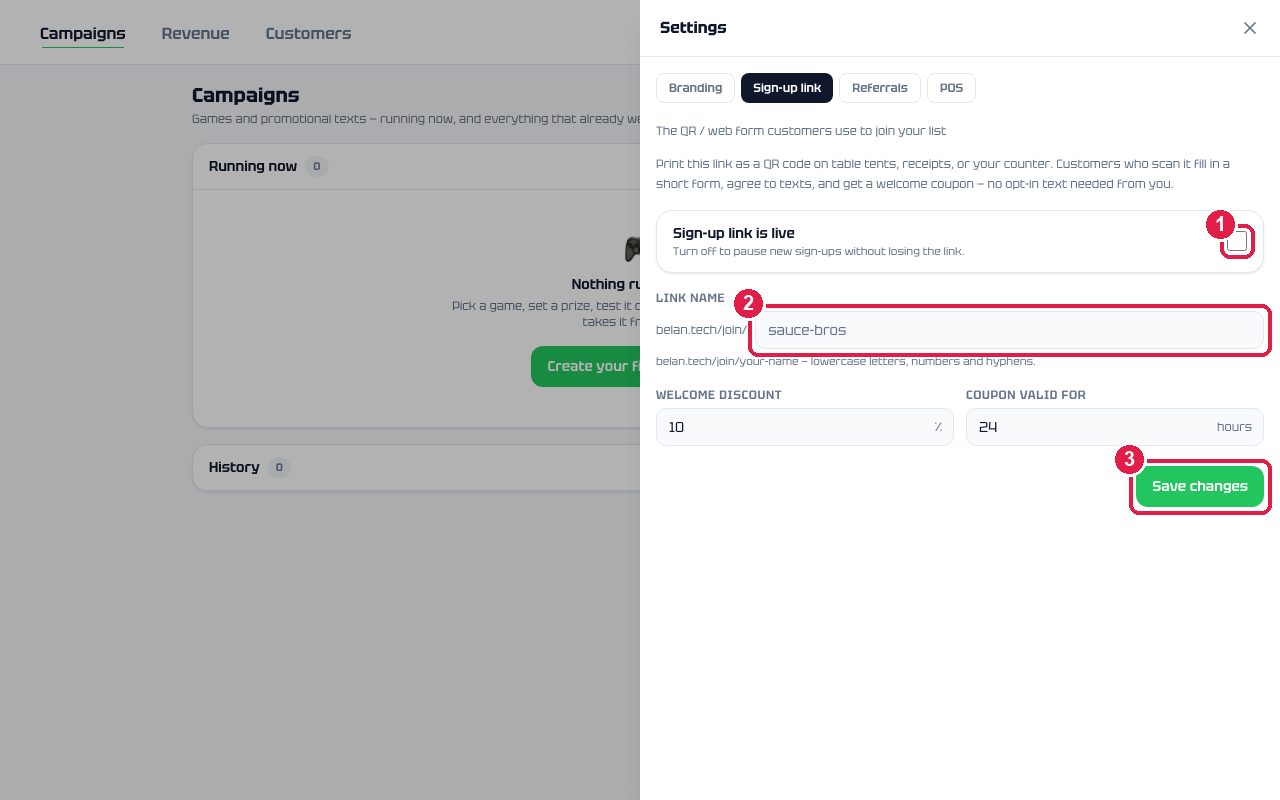
- Tick the toggle, type a link name (letters, numbers, hyphens), set the welcome discount and how long it lasts, Save.
- Copy the link (it appears under the form as
belan.tech/join/<name>). Make a QR code from it with any free QR generator and send the owner a printable card, or ask engineering for one. - Suggest three spots: the counter, every table, the receipt.
Import the contacts they already have (Excel / CSV)
Where: Campaigns → Contacts → Import contacts.
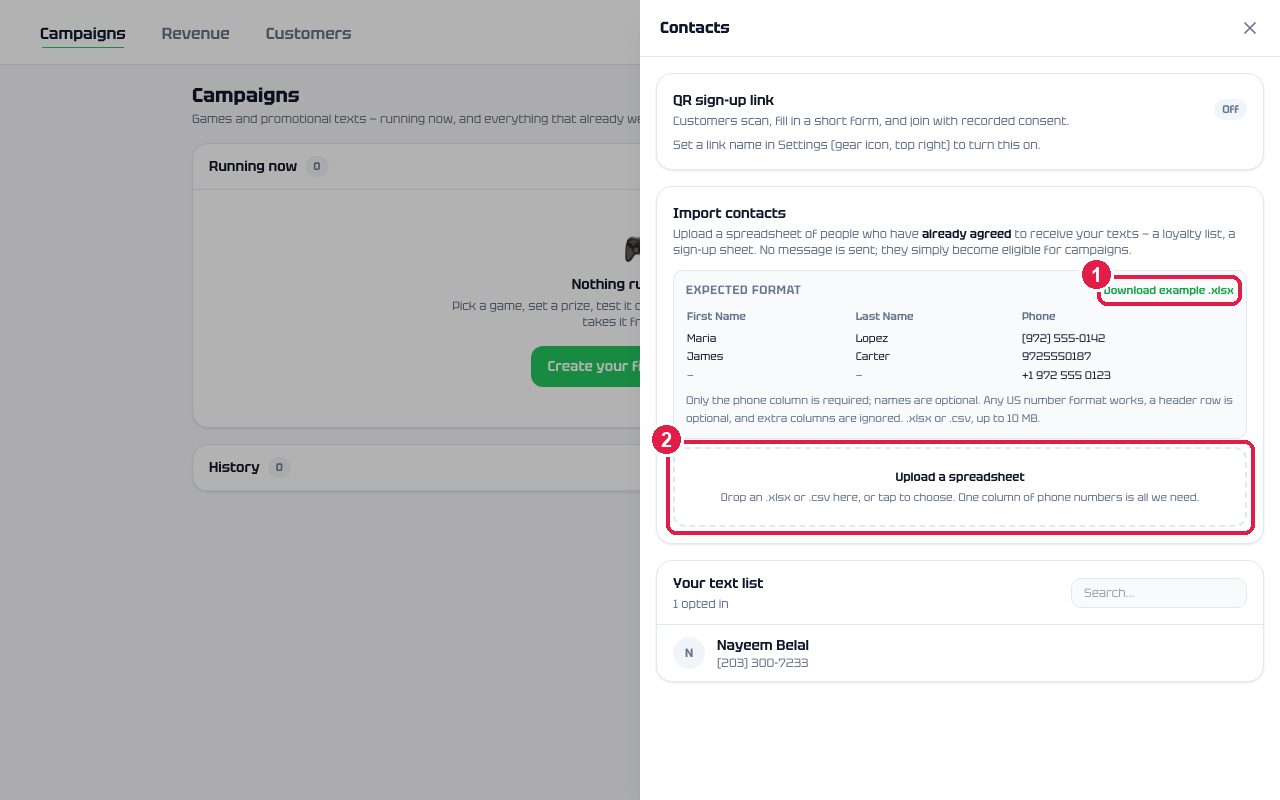
The file: one column of phone numbers is all that’s required. Names are optional. Any US number format works; a header row is optional; extra columns are ignored.
| First Name | Last Name | Phone |
|---|---|---|
| Maria | Lopez | (972) 555-0142 |
| James | Carter | 9725550187 |
| +1 972 555 0123 |
- Drop the file. Belan shows how many numbers it read, how many are new, how many were already on the list, and any rows it couldn’t read (with row numbers, so the owner can fix them in Excel).
- Owner ticks “I confirm every contact in this file has already agreed…”.
- Click Add N contacts to my list. No text is sent. They are immediately available to campaigns.
The first campaign, tested on their own phone
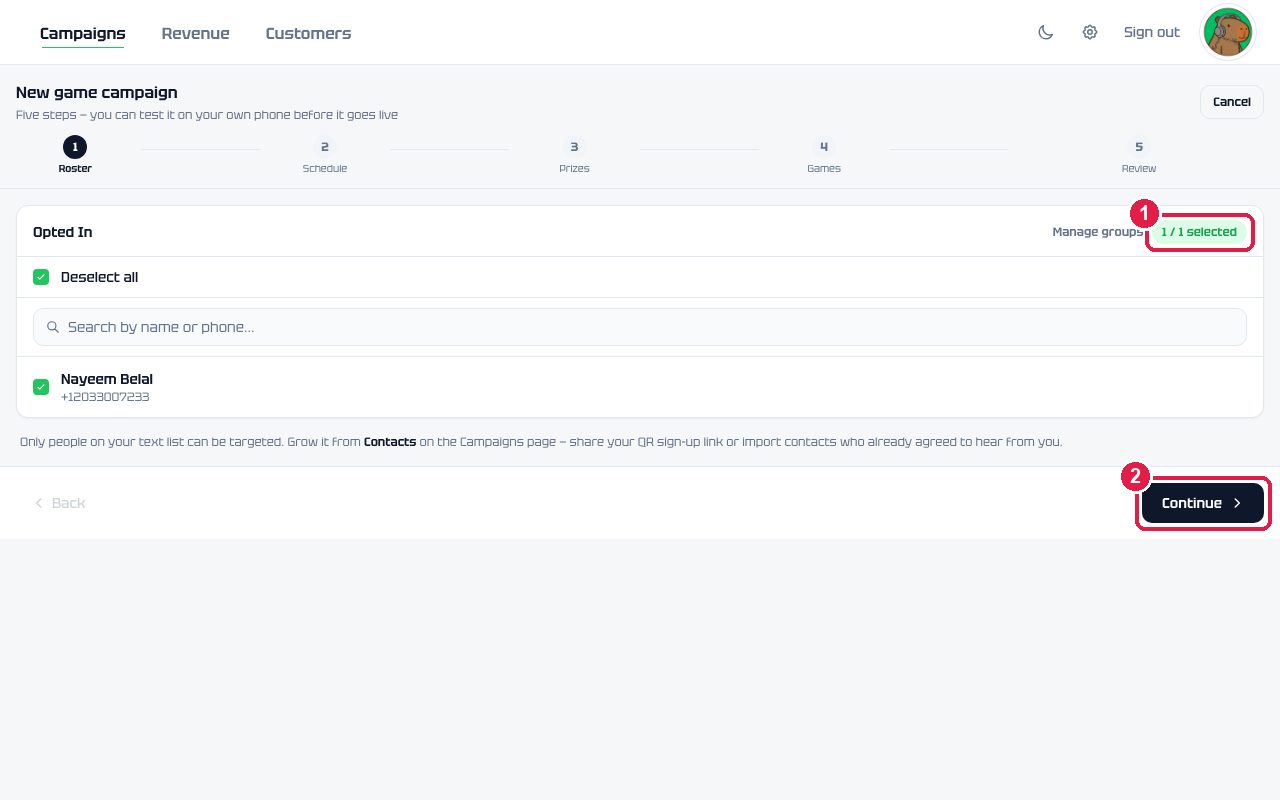
Where: Campaigns → New campaign → Game campaign. Five steps.
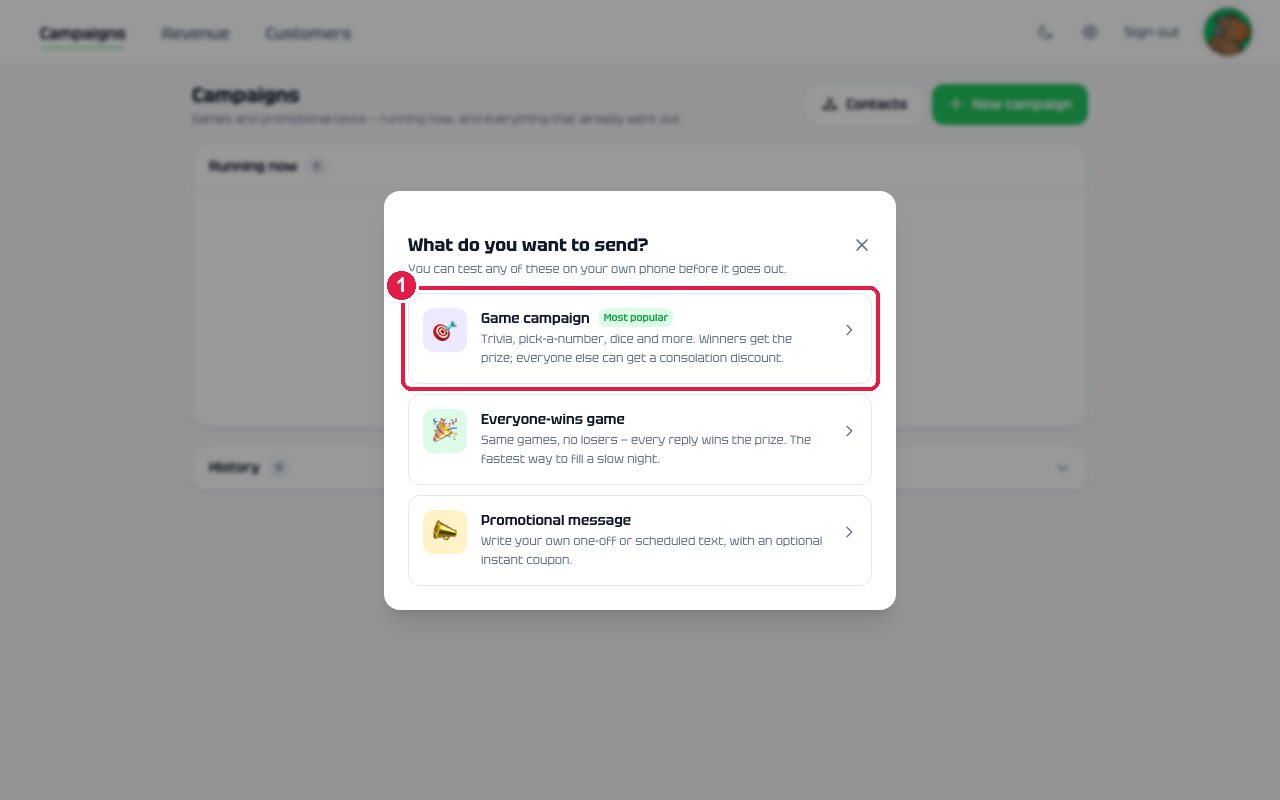
Step 1 · Roster
Step 2 · Schedule
Step 3 · Prizes
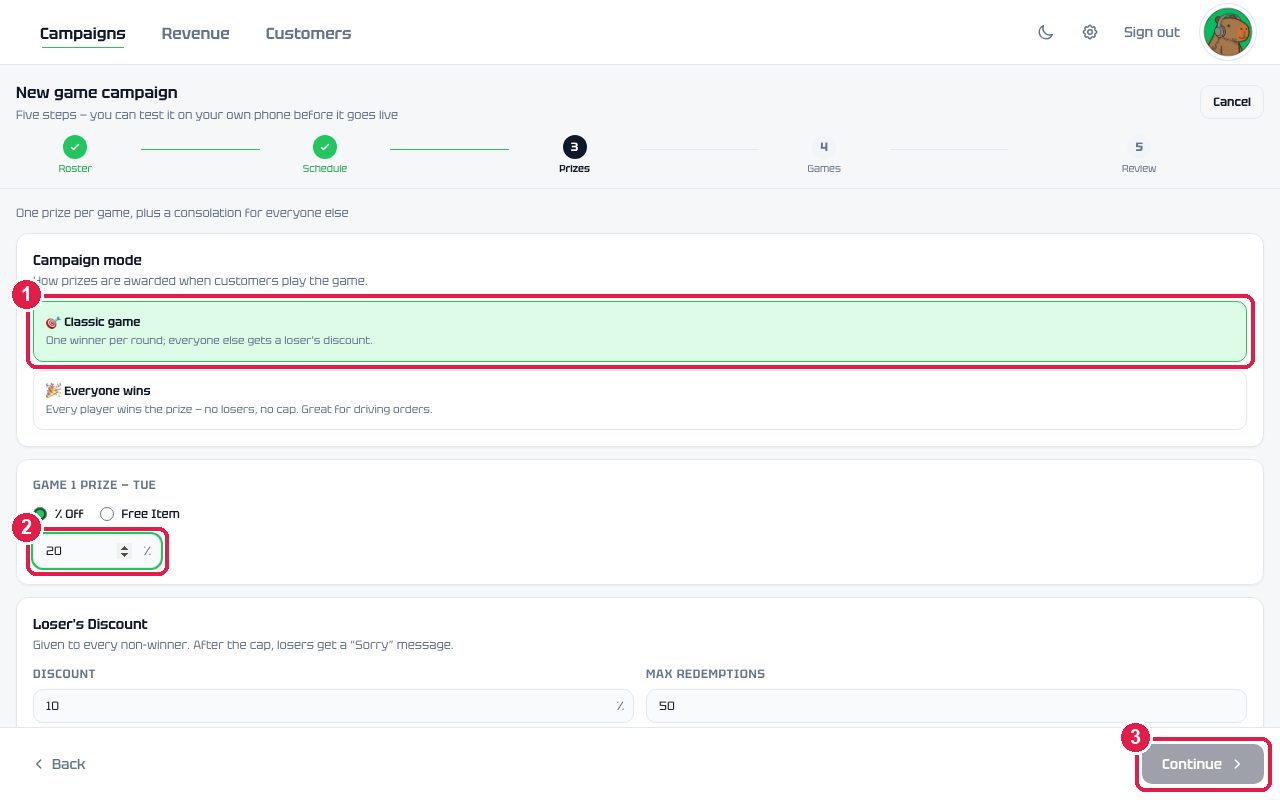
Further down the same screen: the consolation discount (default 10%) and how long coupons last (default: until 11 PM the next day). Shorter windows bring people in sooner.
Step 4 · Games, and the test
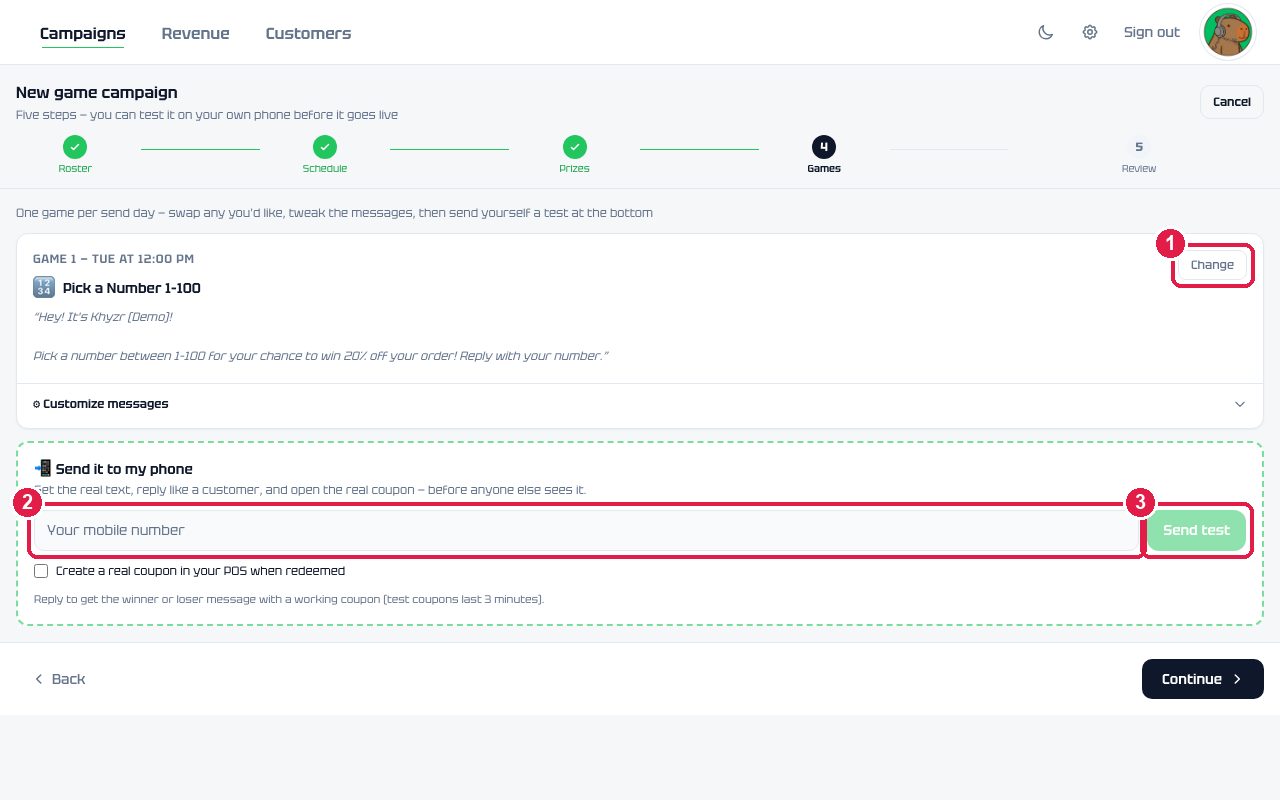
- Owner types their own mobile number and clicks Send test. Leave “Create a real coupon in your POS” unticked for the test unless they want to see the discount appear in Clover (it self-deletes after 3 minutes).
- They reply to the text with the answer the screen tells them. They get the winner text with a coupon link.
- They tap the link. This is the moment: the branded thumbnail, the coupon page, the redeem button. Let them play with it.
Step 5 · Review and launch
After launch: what to look at, and when
Where: Campaigns (detail), Customers, Revenue.
- Campaigns: the campaign appears under “Running now”. Click it for sent / played / won counts per game, and Pause or Resume.
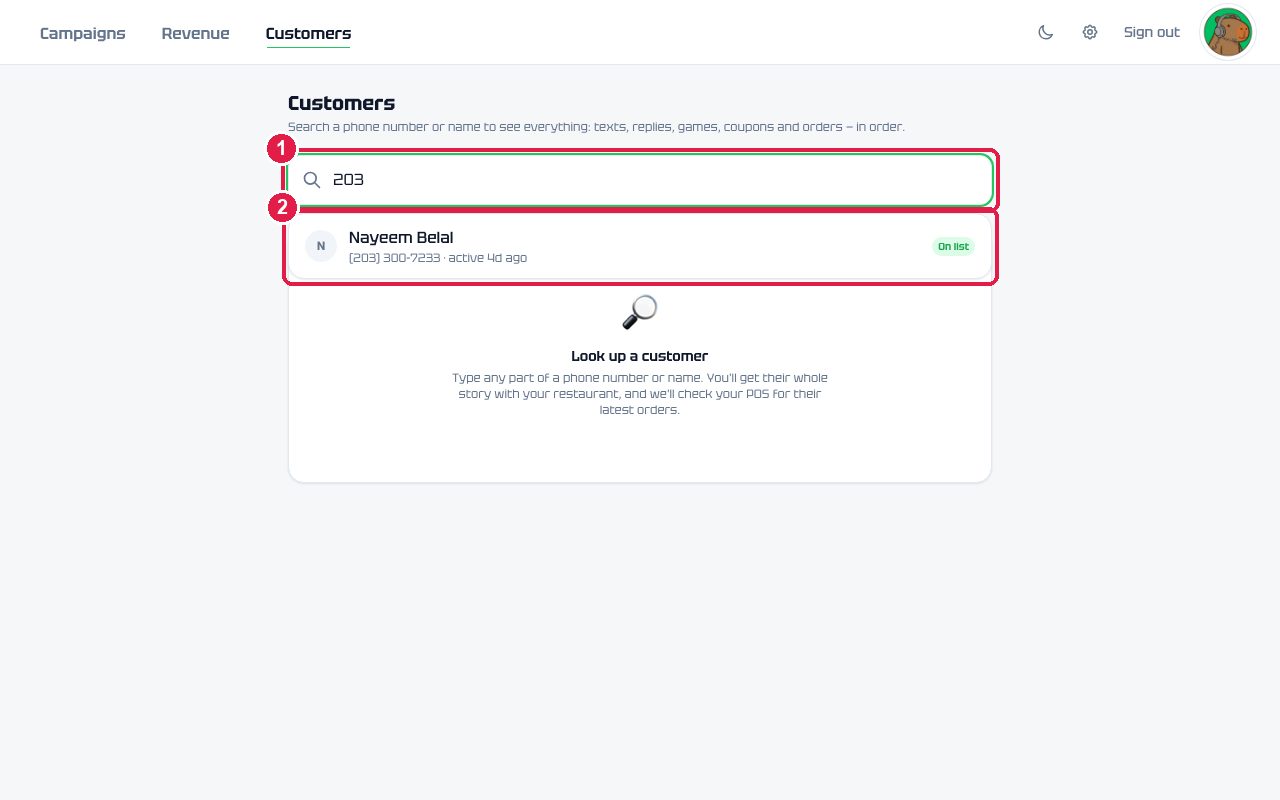
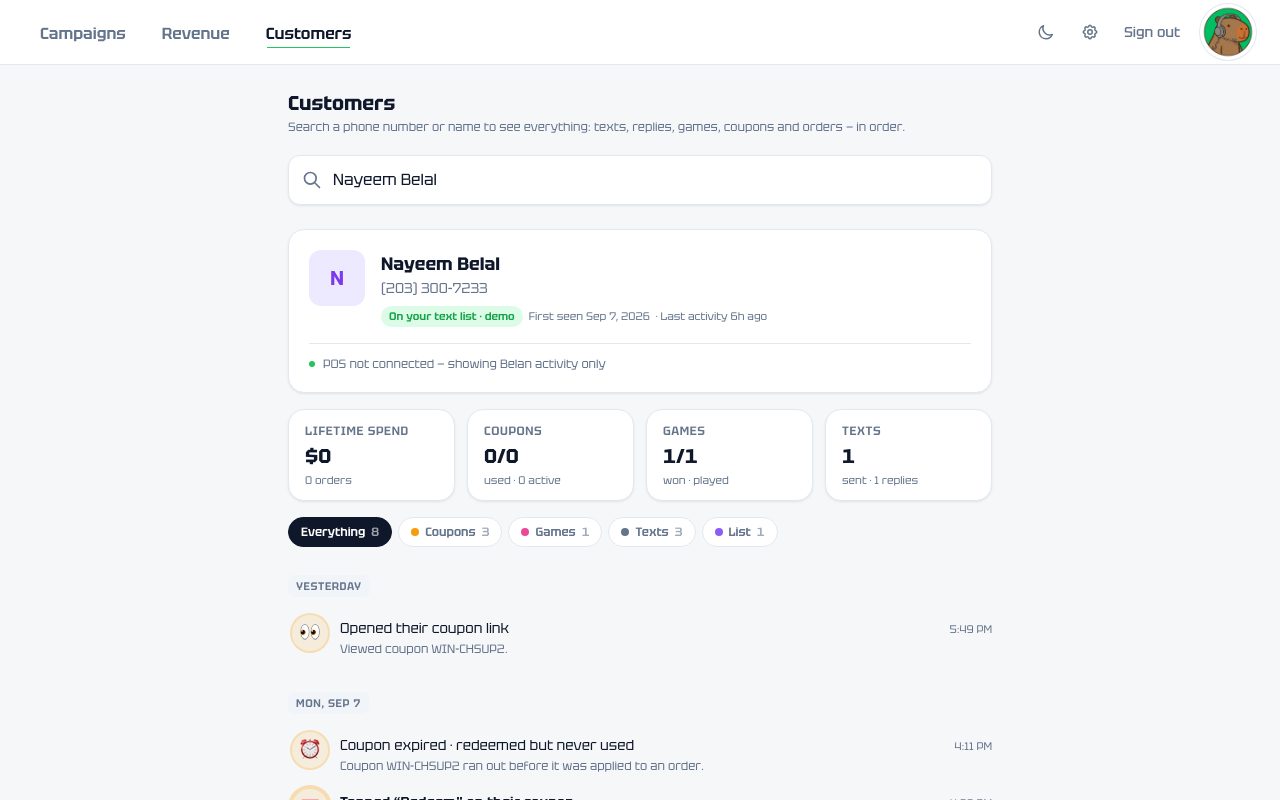
- Customers: type any part of a phone number or name to see that person’s full story: every text and reply, games, coupons opened / redeemed / used, and their POS orders. Use it when an owner asks “did so-and-so ever come in?”
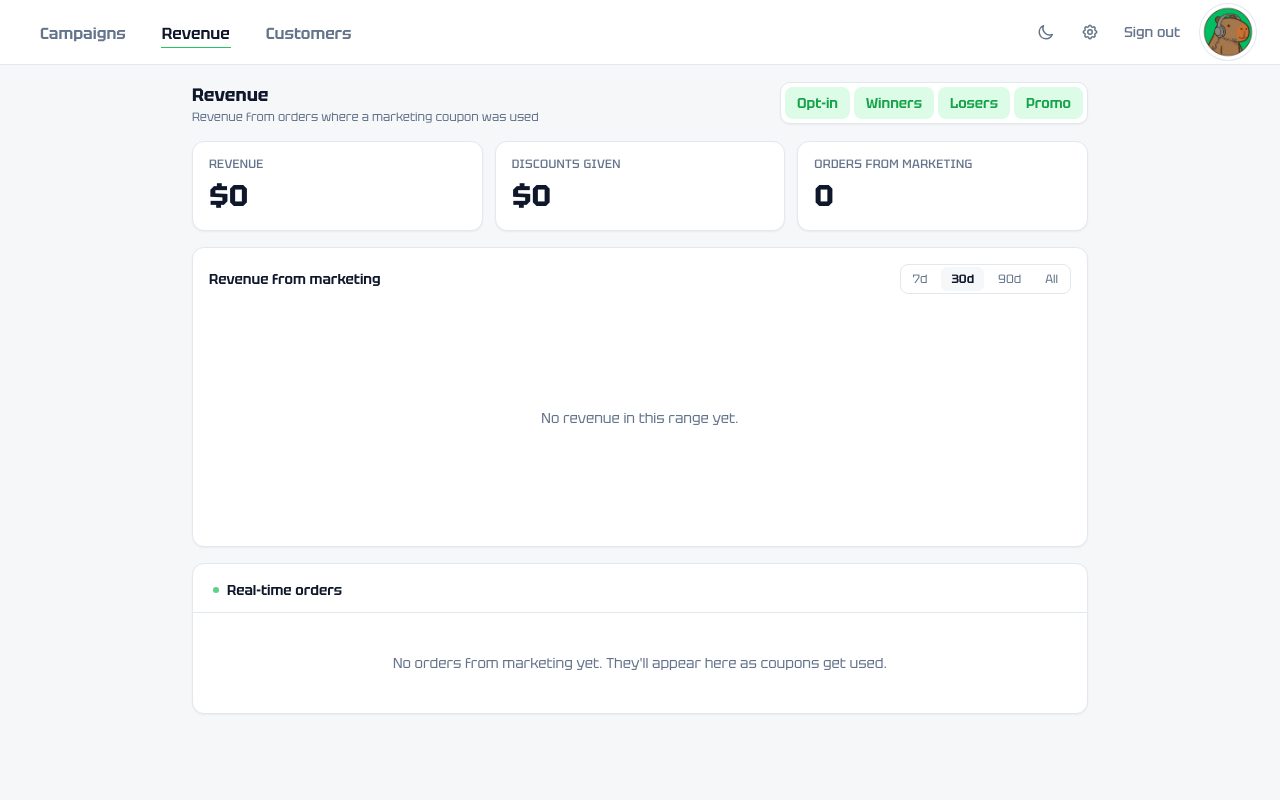
- Revenue: every order that used a coupon, pulled from Clover, with the discount given and the revenue it brought.
Problems you’ll see, and what to do
| What they say | What it usually is | Do this |
|---|---|---|
| “My restaurant isn’t in the list” (step 2) | Step 0 not done, or already claimed | Ping engineering with the restaurant name |
| “Connect failed” (step 6) | Wrong merchant ID, or a token missing a permission | Re-check the ID; recreate the token with Customers, Orders, Inventory (read+write), Merchant |
| “The coupon says it couldn’t create the discount” | POS not connected | Do step 6, then have the customer tap redeem again |
| “Nobody got the text” | Campaign is paused, or the send time hasn’t arrived | Open the campaign; check status and next send time |
| “Can I text my whole customer list to get them to opt in?” | Unsolicited opt-in texts are turned off in Belan for now | Use the QR sign-up link (step 8) and the consented import (step 9) |
| “I want Toast / Square” | Clover only today | Take the details; Toast is in progress. Games and coupons still work; the register discount is typed by the cashier |
Anything else: engineering, with the restaurant name, the owner’s email, and a screenshot.